Archive for gardening

Prepare your Garden for Summer Heat Waves

Think About Resilience From the Outset

If you have not yet established your vegetable plot, I recommend thinking about resilience from the outset. Think about weather conditions which may be experienced in our area. Plant for as much biodiversity as possible and make a climate-resilient garden through the plants you choose, and the ways in which you think about soil, water, and other factors.

Remember, growing in rows in a traditional vegetable garden is not the only option. Perennial planting schemes like forest gardens can make your garden far more resilient, whatever extreme weather conditions climate change will bring. 

Provide Plants With Shade During the Hottest Part of the Day

If you already have a vegetable plot and have been caught out by a heat wave, I suggest thinking about shade. Shade can reduce temperatures considerably. It can stop certain plants from bolting prematurely.

And, of course, shade can reduce water use. Typically, vegetable plots in temperate climate zones are positioned in full sun, or close to full sun. But when there is extreme heat, these spots can become scorching. So adding shade during the hottest periods could help. 

Shade cloth is one simple option. But remember, you can use reclaimed, natural fabrics for a more eco-friendly solution. 

Shading with other plants can also be beneficial. Think about using trees, shrubs, or even taller annual plants to provide shade for those other plants which need it. You might also place a trellis or other support structure with climbing plants that provide some shade. A good layout in a vegetable garden can make a big difference. In the northern hemisphere, remember that shade plants should be positioned to the south or west of other plants to provide shade during the hottest part of the day. 

Avoid Bare Soil

I advise making sure the soil is covered, either with mulch or living plants, to reduce water loss from the soil and reduce local soil temperatures. Remember, protecting your garden during a heat wave includes taking care of the soil and its complex web of life, not just your plants. And an area of bare soil will emit far more heat than a vegetated area. 

Improve Irrigation or Watering Systems

The best time to think about irrigation and watering is obviously before extreme weather arrives. But you can still beat the heat in your garden if you think about these things once the hot weather arrives. 

Obviously, during hot weather, watering needs will increase. So manual watering can be more of a challenge. If you do not already have sustainable watering systems such as drip irrigation, or clay pot, or water globe irrigation for a smaller space, now could be a good time to get them in place.

Consider adding automation to make it easier to make sure you meet the water needs of your plants. Though of course, you should also make sure you have a sustainable supply. And set up rainwater harvesting systems. 

Add Thermal Mass

Choosing the right bed edging could also help you beat the heat. Materials with high thermal mass catch and store the sun’s heat energy during the day and release it slowly when temperatures fall. So they can help keep temperatures more stable in an area.

While particularly beneficial in a greenhouse or other undercover growing area, adding thermal mass may also be beneficial in other areas of your garden. Choose materials like stone, clay, earth, etc., and consider carefully how these can be used within your garden design. They can help beat the heat in summer and help with the cold temperatures in winter too. 

Beat the Heat in Outdoor Living Areas

While growing food and other resources in your garden is important, you might also like to consider how you can continue to enjoy outdoor living areas during a heat wave. 

To make your garden a more pleasant place to spend time in summer, you might like to consider making sure that you have shaded seating areas—below trees, arbors, pergolas, or other structures clad with climbing plants, for example. 

In high temperatures, making sure your garden has water available for wildlife is even more crucial than usual. And when you attract plenty of wildlife, your garden can be an even more pleasing place to spend some time. 

In some gardens, taking a dip could be the perfect way to cool off on a hot day. A natural swimming pond or natural swimming pool could be the ideal eco-friendly solution. 

And finally, when enjoying your garden, think about ways to make the most of your home-grown produce. For example, create some cooling cordials, smoothies, ice-creams, or ice lollies using the fruits and berries (and even vegetables and/or herbs) that you grow.

Posted in: Around the District, Community, Compost, Conservation, Customer Infomation, Drought, Edible Landscaping, Freebies, From the Office, Garden, gardening, Homesteading, Mulch, Pine Cove Water District, The Garden, Uncategorized, Weather

Leave a Comment (0) →

Spring Gardening Checklist

Use this checklist to to support and protect new growth in your garden

  1. Prune non-spring blooming shrubs and trees
    (This should be done by the beginning of August)
  2. Prune ornamental grasses and remaining perennial foliage
  3. Make the beds
    (Though leaves and unwanted debris at once served the purpose of protecting your plants, your spring plants are ready for some sun)
  4. Weed, feed, and mulch
    (Clear all unwanted waste and weeds, loosen the soil around the plants, and mix in some organic matter / plant food to ensure your plants have the nutrients they need to grow, bud, and bloom)
  5. Stir compost bin or build one
    (Build or purchase one to organically recycle nutrients and keep them out of landfill)
  6. Apply pest control
    (Follow instructions and always wash your hands when you’re done. Be sure to keep pets and children away from the treated area)
  7. Complete or start landscaping projects
  8. Plan new plantings and beds
    (Always plan your bed before purchasing the plants. Understand your plants environment to properly position them with all their factors taken into consideration)
  9. Clean out the shed and feed the birds
    (Get rid of the old, and in with the new. Go ahead and add bird seed to the bird feeders – they are just as ready for spring as you and your flowers!)
  10. Frost no more!
    (As soon as frost and cold weather are no longer an issue, feel free to apply fertilizer or transplant existing plants and plant new ones)

Posted in: Around the District, Community, Company News, Compost, Customer Infomation, Freebies, From the Office, Garden, gardening, Pine Cove Water District, Recycling, The Garden, Uncategorized, Weather, Weekend

Leave a Comment (0) →

  Help Create Habitats for Monarch Butterflies

One of the many wonderful things we get to experience in this beautiful mountain town is all the wild life. The spring time is a great time to see the beautiful butterflies touch down in our garden making it even more magical. While butterfly bushes do attract these majestic creatures, it in fact is actually milk weed that Monarch butterflies call home, mate, and lay their eggs.

Planting milkweed will support the monarch populations, and their incredible migrationMonarchs cannot survive without milkweed. Monarch butterflies need milkweed to lay their eggs and the caterpillars of these butterflies only eat milkweed plants. We have lost much milkweed from the natural landscape with shifting land management practices. Planting milkweed is a great way to help other pollinators too because milkweed provides valuable nectar to many types of bees and butterflies.

Adult monarchs will drink the nectar of milkweed and many other flowers. In fact, they need sources of nectar to nourish them throughout the entire growing season. Include a variety of native flowering species with different bloom times to provide monarchs with the food they need to reproduce in the spring and summer and to migrate in the fall. Offering a wide array of native nectar plants will attract monarchs and many other butterflies and pollinators to your habitat all season long.

Key Habitat Considerations

  • Native milkweeds provide food for monarch caterpillars.
  • Native flowers provide food for adult butterflies. A combination of early, middle and late blooming species, with overlap in flowering times, will fuel butterfly breeding and migration and provide beautiful blooms season-long.
  • Insecticides should never be used in or surrounding pollinator habitat. Limit use of herbicides within and surrounding the habitat only to control invasive or noxious weeds.
  • Habitats can be created in any open space protected from untimely mowing or pesticide application.

You can check with local native plant nurseries or greenhouses for their recommendations of good pollinator plants for your area.

Milkweeds can be propagated from seeds, cuttings, and, in some cases, from root divisions. Milkweed seeds can be planted in prepared beds outdoors or started indoors in flats. We recommend the latter approach since germination rates are usually higher indoors and it is easier to establish your milkweeds with transplanted seedlings that are well-rooted and therefore more resistant to weather extremes and pests.

Harvest and Storage of Milkweed Seeds

If you have some milkweed and would like more for next year to promote butterfly a habitat in your garden; the timing of the collection of milkweed pods or seeds is critical. Mature pods are those that are within a day or two of opening. If you squeeze the pods and they don’t open easily, they usually do not contain mature brown seeds. Seeds well into the process of browning and hardening will germinate when planted the next season. Pale or white seeds should be not collected.

Preparation for planting

To stratify seeds, place them in cold, moist potting soil (sterilized soil is best but is not required) in a dark place for several weeks or months. Since most people prefer not to place potting soil in their refrigerators, an alternative is to place the seeds between moist paper towels in a plastic bag. This procedure works well, in part because there are fewer fungi and bacteria available to attack the seeds. After a stratification period of 3-6 weeks, the seeds can be planted in warm (70˚F), moist soil. Without stratification, the percentage of seeds that germinate is usually low.

Germinating, Growing and Transplanting
Milkweed seedlings can be started indoors in a greenhouse or under artificial lighting and then transplanted outdoors after the average date of last frost. If seeds are started indoors, allow 4-8 weeks growing time before transplanting. Plastic flats can be used to start the seeds. Fill the flats with a soil mix thoroughly soak the soil, and let the excess water drain. Sow the seeds by scattering them on the soil surface 1/4-1/2 inch apart, and then cover with about 1/4 inch of additional soil mix. Gently mist the soil surface with water to dampen the additional soil mix that has been added. To improve germination rates, you can place the seeds in packets made from paper towels and soak them in warm water for 24 hours prior to planting. This method seems to work especially well for seeds of species that require stratification.

After the seeds are sown in the flats, cover each flat with a clear plastic cover or a plastic bag to keep the seeds from drying out while germinating. Then, place the flat under grow lights, in a warm sunny window, or in a greenhouse. Most seeds will germinate in 7-10 days if the flats are maintained at 75˚F. After the seeds have germinated, remove the plastic covering from the flats. Once the seedlings have emerged, the soil should be kept moist by watering the flat from the bottom. You can water from the bottom by placing the flat in a sink or a larger flat filled with 2 inches of water until moisture appears on the soil surface. The soil should be kept moist but some care is needed to keep the seedlings from getting too wet to prevent any fungal growth.

The plants are ready to be transplanted when they are about 3-6 inches in height. Before transplanting, acclimate the plants to outdoor conditions for a few days by placing them in a sheltered location during the day and then bringing them indoors at night. The seedlings should be planted 6-24 inches apart depending on the species (check the back of your seed packets for information). Newly transplanted plants should be watered frequently. Add mulch around the seedlings soon after planting. The mulch holds in the moisture and minimizes the growth of competing weeds. The seedlings should be fertilized 2-3 times during the growing season if using water-soluble fertilizer or once a season if you utilize a granulated time-release formulation.

When to Plant
Milkweed seeds can be sown outdoors after the danger of frost has passed. Plant the seeds early since those planted late in the season may not germinate because of high temperatures. Keep in mind that seeds have a range of soil temperatures at which they will germinate. Remember sunny conditions can cause the soil temperatures can be much higher in daytime. Germination outdoors depends on soil moisture and temperature and could take several weeks if conditions are not ideal.

Posted in: Animals, Around the District, Community, Customer Infomation, From the Office, Garden, gardening, Monarch Butterflies, Pine Cove Water District, The Garden, Uncategorized, Upcoming Events, Weather, Weekend

Leave a Comment (0) →

Free Wood Chips!

Spring cleaning and gardening season is here or for others right around the corner. Thinking of getting in the gardening spirit here soon?

PCWD offers free wood chips to our customers. If you are interested in wood chips just come on by the Dutch Flats location anytime. It is great for gardening, holding in moisture of soil and makes a nice added touch to spruce up your yard or potted plants.

You must bring your own materials to gather or shovel and haul the mulch or wood chips away. If you are planning on gathering a large amount on your own, please let us know in the office as we want to be sure there is enough for everyone.


Check out this great video of a brief overview of our Dutch Flats location.

Making Dutch Flats Healthy on Vimeo

Also, if you need a larger load of wood chips, call the office and we can deliver a dump truck load for $125 delivery charge.

Posted in: Around the District, Community, Company News, Compost, Customer Infomation, Freebies, From the Office, Garden, gardening, Homesteading, Mulch, Pine Cove Water District, Re-purposing, The Garden, Upcoming Events, Wood chips

Leave a Comment (0) →

Growing Season!

It is almost time to shake off those winter blues and dive headfirst into the glorious era of spring gardening. March is the perfect time to begin sowing seeds and planting all sorts of greenery.

March is prime time for getting your vegetable garden off to a roaring start. Roll out the green carpet for veggies such as lettuce, kale, and spinach. As it gets warmer sow crops like tomatoes, peppers and squash indoors, and your taste buds will be doing a happy dance at harvest time.

We know spring is about flowers, and March is the perfect month to plant those eye-popping beauties. Start sowing annual seeds like marigolds, sunflowers, and zinnias, or plant bulbs for dazzling dahlias. Also, consider cold-hardy grasses or dramatic perennials like coneflowers for visual impact.

In March, it is also a great time to begin sowing for aromatic herbs like basil, parsley, cilantro, and chives. Your culinary creations will be the talk of the town (or at least at the family dinner.)

While your at it, why not turn your garden into a fruit filled paradise? March also a perfect time to plant fruit trees like apricots, peaches, and plums, or berry bushes like raspberries and blackberries. You’ll be basking in the sweet, juicy rewards of your labor.

Give your garden a local touch by planting native California plants. March is an ideal time to start sowing seeds for drought tolerant beauties like poppies, lupines, and sagebrush. Not only will you create a stunning low-maintenance landscape, but also provide habitat for local wildlife!

March is the perfect month to begin a fantastic growing season. With a mix of veggies, herbs, flowers, fruits, and foliage, you’ll create a stunningly diverse landscape that is pleasing to the eye and palate. So embrace your inner gardener, have fun, and let the March planting madness begin!

https://idyllwildgardenclub.com/event/empower-your-food-production/

Posted in: Around the District, Community, Company News, Customer Infomation, From the Office, Garden, gardening, Homesteading, Pine Cove Water District, The Garden, Weekend

Leave a Comment (0) →

What’s in your garden?

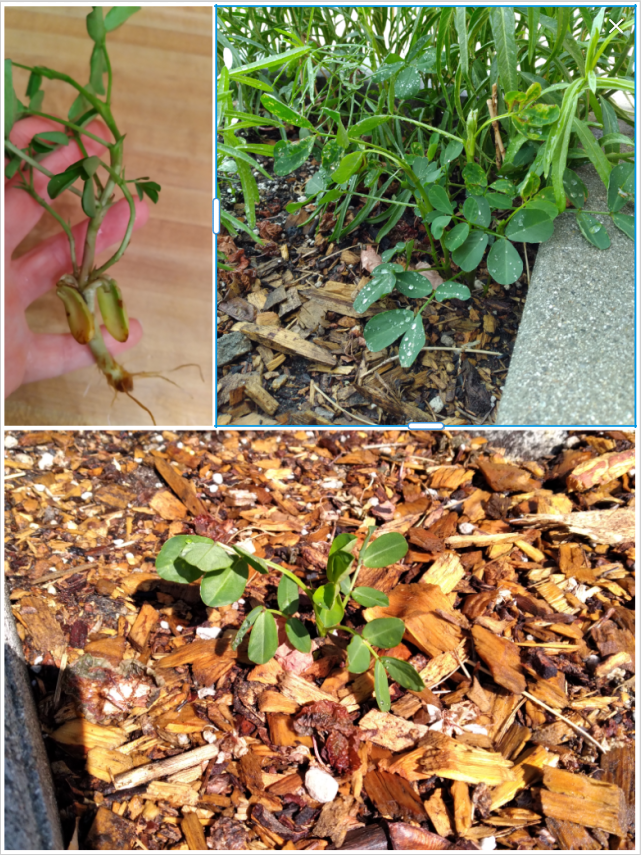
Over the winter I watched squirrels burry peanuts in our butterfly garden, never thinking they would sprout. Surprisingly enough, as I was pulling weeds, I pulled one that had PEANUTS as it’s roots! I was so excited to see so many more still planted. I looked it up and can’t wait to see the final results. Thanks squirrels!

If you’re interested in the video I watched, click here.

Has Mother Nature gifted you with any unexpected foliage? We’d love to see it.

Posted in: Animals, Around the District, Edible Landscaping, Garden, gardening, The Garden

Leave a Comment (0) →

Rain Barrels

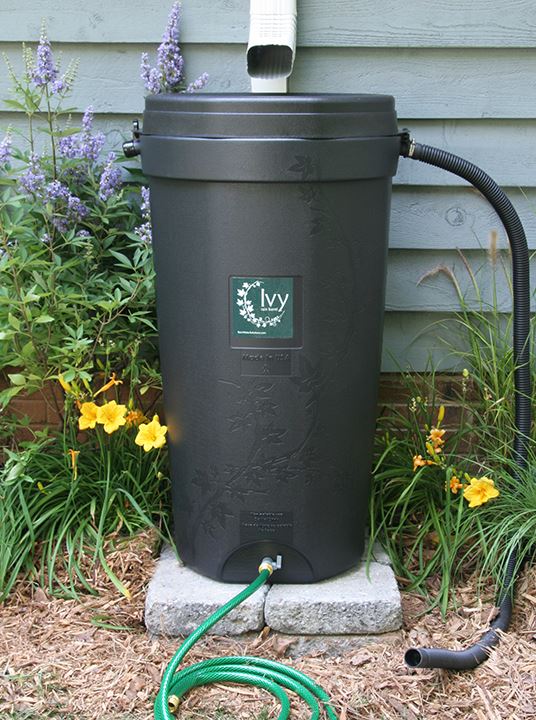
We are excited to bring back the rain barrels. We have had enough interest to get an initial order started.

If you are still interested in purchasing a rain barrel, please let us know as soon as possible.

The “Ivy” rain barrel is available in black with all components included to start collecting and reusing your rainwater! Price is $76.00 and you will be sent an invoice.

Made in the USA
Dimensions: 42.5”(h) x 22”(w) x 18”(l)
50 gallons
50% recycled plastic
Locking lid
Linking capacity
2 overflow ports
Meets EPA safety standards
Opaque HDPE material – screened inlet

Posted in: Community, Conservation, gardening, Rain Barrels, Rain Water Harvesting, Water Conservation

Leave a Comment (0) →

Mulch and Wood Chips Available

Thinking gardening time is just around the corner? Just in time for spring cleaning, the PCWD offers free mulch and wood chips to its customers. If you are interested in either wood chips or mulch just come on by the Dutch Flats location anytime. Both are great for gardening, holding in moisture of soil and they make a nice added touch to spruce up your yard or potted plants.

You must bring your own materials to gather or shovel and haul the mulch or wood chips away. If you are planning on gathering a large amount on your own, please let us know in the office as we want to be sure there is enough for everyone.

If you need a larger load of either call the office and we can deliver a dump truck load for $125 delivery charge.

APRIL SPECIAL
Get a dump truck load of WOOD CHIPS for ONLY $75.00
Our deliveries are around 9 cubic yards and you just need to indicate where to leave the pile.

Posted in: Around the District, Community, Compost, Freebies, From the Office, gardening, Mulch, Pine Cove Water District, Wood chips

Leave a Comment (0) →

Pine Needles and other oddities in Composting

With so many pine needles on the ground, it got me wondering about using them in compost. I’ve be verbally told that the pine needles are useless and just need to be raked up and disposed of, but then I came across a little article that mentioned using them. So I decided to see what other oddities you could compost. The main take-away I got was that these items need a little more prep work to make sure they don’t ruin your compost and you have to watch the acidity level and moisture level.

Pine Needles
Pine needles have a pH level between 3.2 and 3.8 when they fall from the tree but have a nearly neutral pH after composting. They break down slowly and have a waxy coating making it difficult for bacteria and fungi to break it down. If you leave the needles on the ground after falling using it as mulch around the trees, speeds up the process. The more aged and smaller they are the faster they will decompose. It’s suggested that one runs a mound of needles over with a lawn mower several times to chop them up and limit them to 10 percent of the total volume of the pile.

Nut Shells
Much like pine needles, nut shells need to be broken down into tiny pieces. Because they are so hard, the article I read suggests saving until you have at least a 1/2 gallons bag worth, pour them onto the driveway and run them over with the car a few times. These are considered a “brown ingredient” and need to be mixed well with a layer of “green ingredients”. Make sure to turn the pile every 2 weeks to add oxygen.
One main caution I saw was black walnuts as they contain a chemical that can inhibit plant growth in garden plants like tomatoes.

Onions
Onions are not recommended for addition to vermicomposting bins because worms are not big fans of odorous food scraps and the acidity does not sit well with worm gastric systems.
To avoid new the onion from growing while it sits in the compost pile, it is suggested to chop it up into halves and quarters before putting into the compost bin.
The main caution to onions is the odor that will stench from their rotting.

Pond Scum
Because pond scum and algae are living organisms, they are a rich source of nitrogen that breaks down quickly in the compost pile. They also add potassium and phosphorus.
So when you do your annual pond cleaning be sure to set aside the scum for your compost.
Use a swimming pool skimmer or rake, let the excess water drain, and then place the scum in a bucket or wheelbarrow. If the water is salty, rince the scum before adding to the compost pile.
To incorporate into your compost, begin with a small layer about 4-6 inches of brown material and mix the scum with green materials, spread this over the brown layer. Top the pile off with regular garden soil, moisten lightly and continue layering brown and green material until at least 3 feet deep. Turn the pile at least once every week checking the moisture every two or three days. The compost should be damp but not dripping.
The compost will be ready to use when it is dark brown with a crumbly texture and rich earthy aroma.

Corn Cob & Husks
Instead of tossing the husks in the trash, they can be put into your compost pile. You can use green husks or brown husks and even the cob. Even though the cob takes longer than the husks, the cobs provide air pockets in the compost pile speeding up the decomposition process so the compost is ready to use quicker than it would be from an oxygen-deprived pile.
Be sure to leave the bottom of your compost bin open so it drains well. Keep a 4:1 ratio of brown to green ingredients (the more green the more moisture it still has). Smaller pieces will decompose faster than larger pieces and turn the pile using a spade fork or shovel at least once a month.
This compost should be ready when it is dark brown and crumbly with no foul odor and no recognizable pieces of organic matter. If you still see some bits of cobs, you can remove those, use the finished compost, and put the cobs back in.

What else have you found to be useful in your compost pile?

Keep on planting, growing, and using our resources wisely!

Happy Spring!

Posted in: Compost, gardening

Leave a Comment (0) →

COMPOSTING

I know there is still snow on the ground and more snow scheduled and you may not be thinking about gardening, but it’s never too soon to start composting.

What is compost?
According to Wikipedia, compost is made by decomposing organic materials into simpler organic and inorganic compounds in a process called composting. This process recycles various organic materials otherwise regarded as waste products. A good compost is rich in plant nutrients and beneficial organisms. Usually with a ph level between 6-8.

Why use compost?
According to Bonnie Plants, compost energizes the soil food web, which is made up of microscopic bacteria and fungi, along with earthworms, crickets, and many other life forms. Many fungi form symbiotic, or mutually rewarding, partnerships with plant roots, making it possible for vegetables to feed themselves more efficiently. Research shows that compost enhances the ability of tomatoes and other vegetables to stand up to common diseases and may improve their flavor and nutrition, too. Compost also helps the soil retain moisture. Through composting you enhance your garden’s ability to grow healthy plants while reducing your volume of trash.

Where to get compost
The Pine Cove Water District usually has compost for FREE for our residents, you can buy bagged compost, but of course, the best is homemade. This is no “recipe” to a perfect compost but a lot of information about what can and cannot be put in and every batch is different depending on what materials go into it.

What CAN be composted?
Most organic materials or items that were once living can be used in compost. Plant-based items used in cooking, such as potato peelings, carrot skins, banana peels, cocoa hulls, coffee grounds and filters, corn cobs, apple cores, eggshells, fruit peels, kelp, and nut shells.
Other items around the house that might surprise you are unused kitty litter, hair, shredded newspapers and cardboard, leaves, flowers, paper, pine needles, ashes, and sawdust.

The most surprising item to me was the pine needles. I think my next blog will be all about pine needles in gardening. (There’s a lot of precaution along with it.)

What CANNOT be composted?
Inorganic and non-biodegradable materials. Plastic, glass, aluminum foil and metal. Pressure-treated lumber, coated or glossy printed papers like catalogs, magazines, wrapping paper, etc. Avoid pet droppings from dogs and cats, animal products like bones, butter, milk, fish skins, and meat as they may decompose and start to smell foul and attract maggots, parasites, pathogens, and other microorganisms that may attract flies and scavenger animals. Plus, they decompose very slowly.
Weeds are not harmful in compost piles but the risk is that their seeds can germinate and infiltrate garden beds when the compost is used. The same can be said for tomato plants and some other hardy fruits and vegetables.

This is just a starting point; If you are interested in making your own compost, it is recommended that you do more research and learn which ingredients can and cannot be added.

Posted in: Compost, gardening

Leave a Comment (0) →
Page 1 of 3 123